Dear INCREASE Citizen Scientist,
As a participant of the Citizen Science Experiment, you are using the dedicated “INCREASE CSA” app for the documentation of your bean journey. To guide you through using the app and recording your experiences and observations as accurately as possible you can find further information, instructions and tutorials here. Just click on the topic you are looking for to read more.
- Validation
To start the Citizen Science Experiment, you need to confirm that you have received the bean package by flagging it in the Validation section of the App. Before sowing the seeds, please follow these steps for validation:
- Click on ‘Validation’ in the menu of the app.
- Once you have opened your package and checked that everything is complete and in good condition, please confirm receipt by ticking the box.
- You will also see a list of all the bean lines you have received, e.g. INCBN_00007
- Open each seed bag at a time.
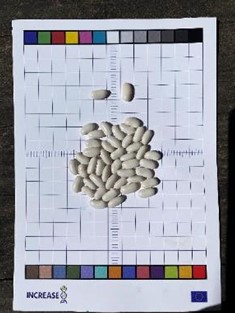
Place the seeds on the provided Colour Checker card and the variety code printed on the bag (you can place the bag together with the seeds on the paper). Please make sure that the colour fields are visible. - Take a picture of the seeds of each variety, e.g. within the app by clicking on the camera symbol.
For visual guidance of the process, please refer to this video tutorial:
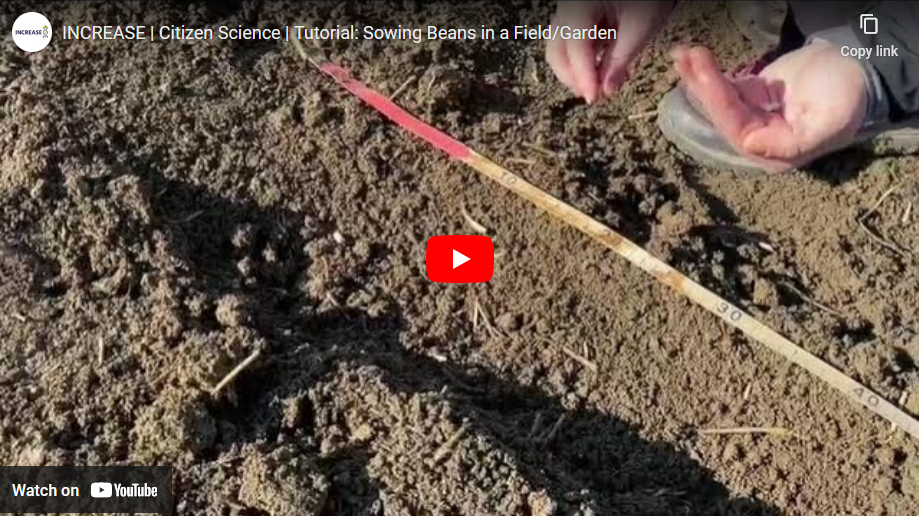
- Sowing plan
In order to prepare the sowing, in the field/garden or in the pot: Create a label for each seed bag (each seed bag contains seeds of an individual variety, data should be taken separately for each variety), using the INCREASE code or the coloured letter on the top left corner of the bag, e.g. A for the control variety Meccearly (send to every citizen), B for INCBN_000XYZ, etc. (please see video tutorial below). When preparing the label, please consider that weather events, like sun, rain, etc., can damage the label during the plant cycle, so please use a resistant material and marker.
- Use the bag-specific label to identify the plot/row in the field or to identify the pot.
- Please use the specific label to identify the variety when collecting the data.
- Seed bag = one variety = one line = from 3 to 10 seeds
- Each citizen has received 6 different lines, from A to F.
Sowing plan options
There are three different options to plan your sowing:
- Unreplicated
A) E.g. Six rows of six plants (one per variety)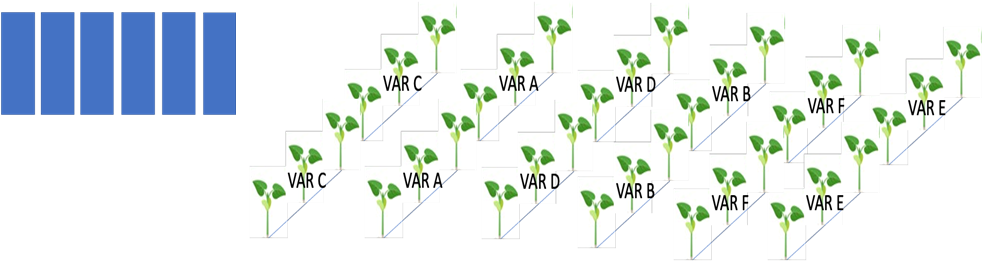
B) E.g. Six pairs of rows of three plants
- Unreplicated
In the designs above you have only one spot for each of the six varieties and you can grow 1 (e.g. in a pot), 3 or 6 plants of the same variety in a row. The order of varieties is your own choice which you will indicate in the App as part of setting up the sowing plan in the section ‘Plant sowing’.
We will ask for phenotypic observations for each variety and not individually for each plant within a variety (in case you grow more than one plant per variety).- Replicated - Blocks
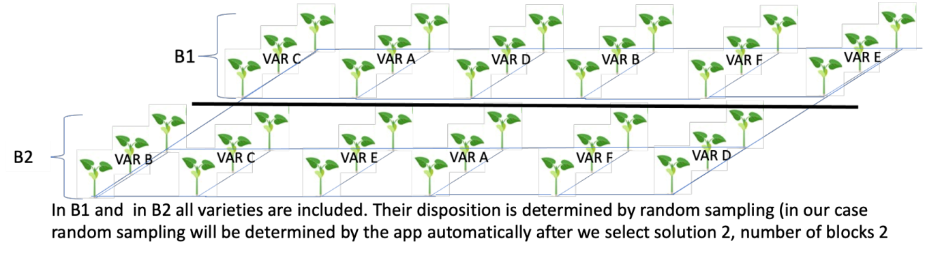
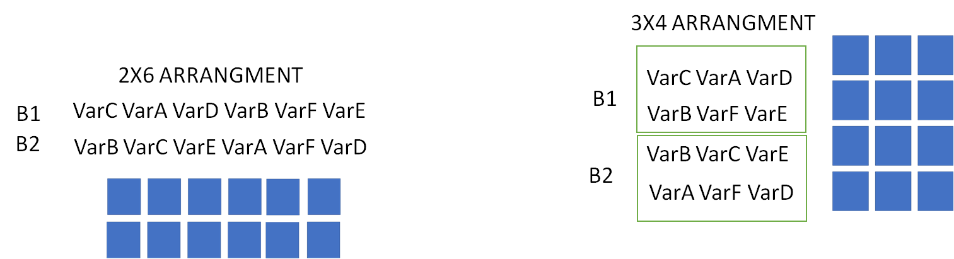
In this design you have two spots for each of the six varieties and for each variety a number of three plants is grown in each spot. This means that you have two locations in your field/garden where the six varieties are grown. Each location with all six varieties is called a block. Each block should have the same dimension and distances between plants/varieties, but the order of the six varieties within blocks will differ.
Depending on your available space, you have two options of how the varieties within each block can be arranged.
We will ask for phenotypic observations within the blocks for each variety and not individually for each plant. Meaning, you will have two phenotypic observations per variety (one in the first block, another in block two).Label your varieties according to the block number: A1 to F1 for block 1 and A2 to F2 in block 2.
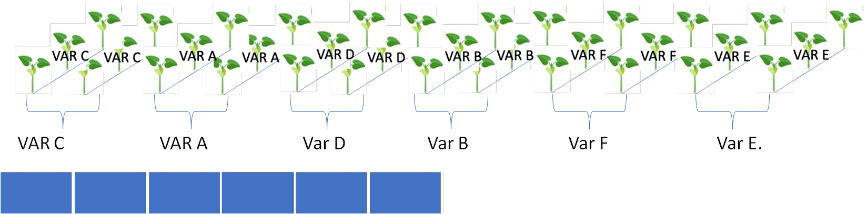
- Freely replicated (2 replicates)
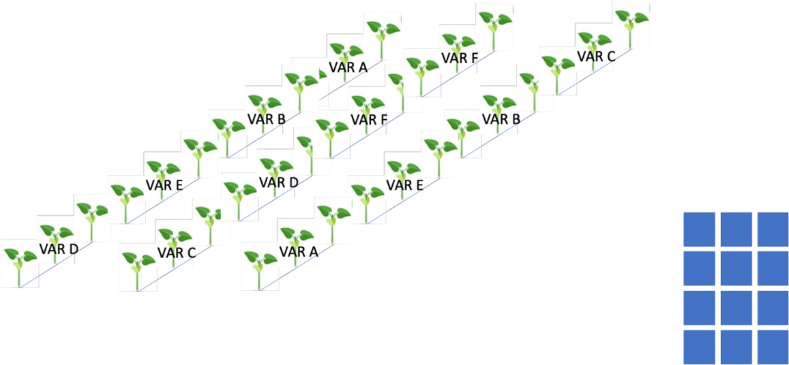
Freely replicated: Here, a 4X3 arrangement is shown but as in solution 2 it can also be 2X6.
In this design you have two spots for each of the six varieties and each spot is consisting only of one plant. Depending on your available space, you can grow the varieties and the replicates in three rows with four plants each (within one row, each plant is of a different variety) or in two rows with six plants each (= 6 different varieties).

- Further sowing instructions
Save some seeds: Before you start the experiment and sow the seeds, you should save few seeds per bag (save at least 1 seed if you received 3, 4 or 5 seeds per bag, or at least 2 seeds if you received 10 seeds per bag). The saved seeds are not being sowed and can be kept in the original bag. This is to guarantee a source of original seed as back-up for any unpredictability. Seeds will not be sent again, and should be multiplied during the experiment.
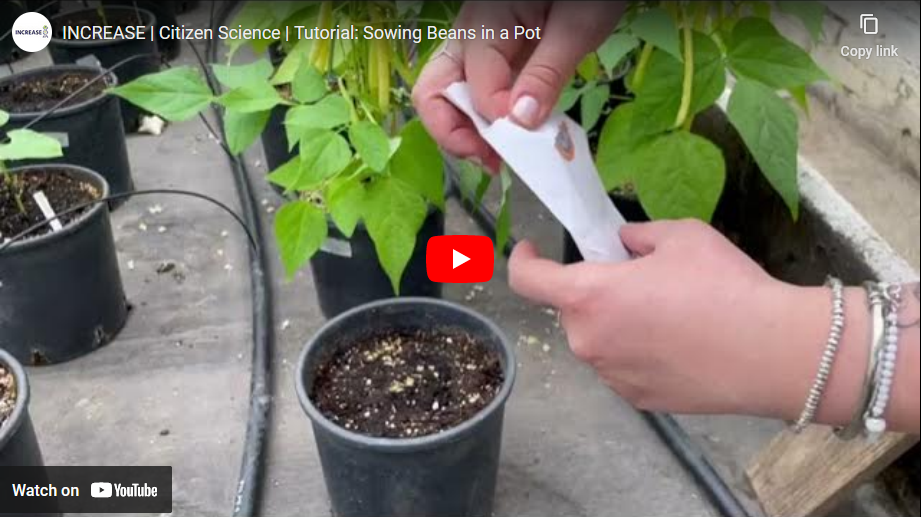
Pre-germination and sowing: After the sowing plan is completed and the labels are ready to be used, you can proceed with the germination facilitation step, using a small glass (one glass for each variety), water and a fridge. Please note that you need one glass per variety: seeds of the same variety can be stored the same glass, but please do not mix the seeds of different varieties. Label the glasses and put the seeds inside. Add water to cover the seeds and leave the glasses with the water and the seeds of the different lines in the fridge (about 4°C) for 20-24h. Then, remove the glasses, take the seeds out off the water and put them directly on soil (field or pot), having labelled the plot and having well-watered the pot or the field soil the day before, in order to sow the seed in a humid, but not soaking, soil bed. Below you can watch a video tutorial on this step.
The before described step can be done if you want to promote a uniform and fast germination, but it is not mandatory. You could also plant the seeds directly into the soil, having watered the soil the day before so that it’s humid, but not soaking.
- Days to germination: 6-10 days
- Temperature: frost-free growing conditions (best when temperatures are stable above 15°C and no more night frosts can occur)
- Light requirements: sun/partial sun
- Watering: normal, but increased need during flowering and fruit set
- Fertilizer: no extra fertilizer needed for field/garden
- Planting depth: 2-4 cm
- Planting distance in garden/field: 20-25 cm
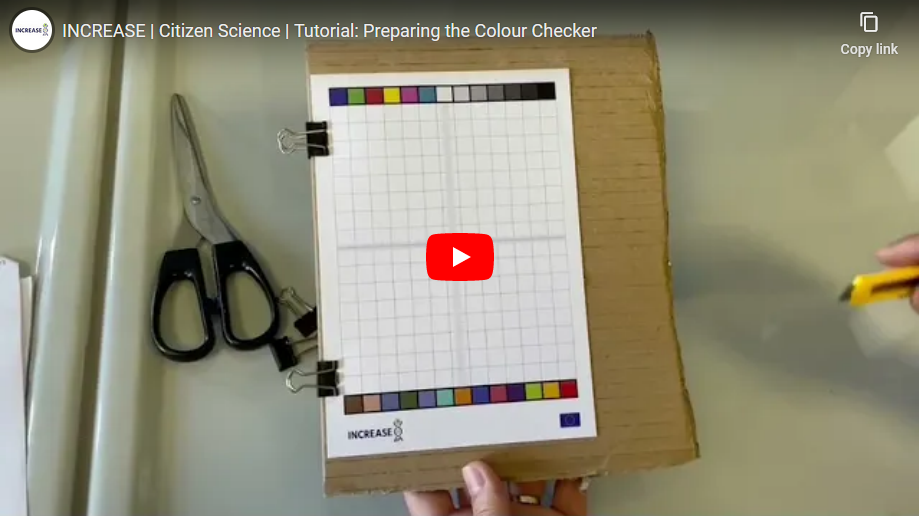
- Correct use of the colour checker
After the sowing plan is set via the app, you will be able to collect a set of data about bean cultivation using the Colour Checker provided. In order to collect accurate data and take high quality pictures, we suggest placing the colour checker on a rigid support. This will reduce image distortions and allow for capturing the traits of the bean plants (flowers, pods, leaves, etc.) more clearly. Please refer to this brief video tutorial on how to construct your rigid colour checker support in a few very easy steps:
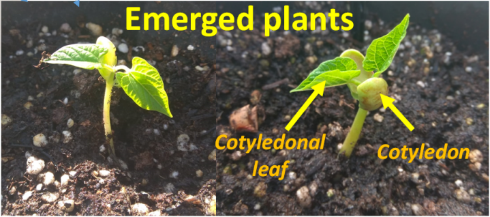
- Sowing/emergence
Once the first plant of each plot has emerged the so-called cotelydonal leaves become visible – see image below. Please inform us when the plant emerges through one of the two options (as indicated in the app):
- Enter the date when you have observed seed emergence.
- Directly take a picture when you see the seed emergence of a particular plot.
- Re-sowing/emergence
In case no seeds in a particular plot have emerged or all emerged plants have died, you can re-sow the seeds you had reserved for this eventuality. When re-sowing, you will be asked to indicate in the app:
- For which plot(s) you had to re-sow
- The re-sowing date
- Emergence of the re-sown plots
- Seedling establishment
Not all seeds of a plot might germinate or not all very young plants survive. Please tell us through the app 10 days after emergence how many healthy plants are present in each plot.
- Hypocotyl pigmentation
Record the colour of the Hypocotyl, the portion of the seedling (young plant) between the soil and the cotyledons (the first pair of emerging leaves), above the soil.
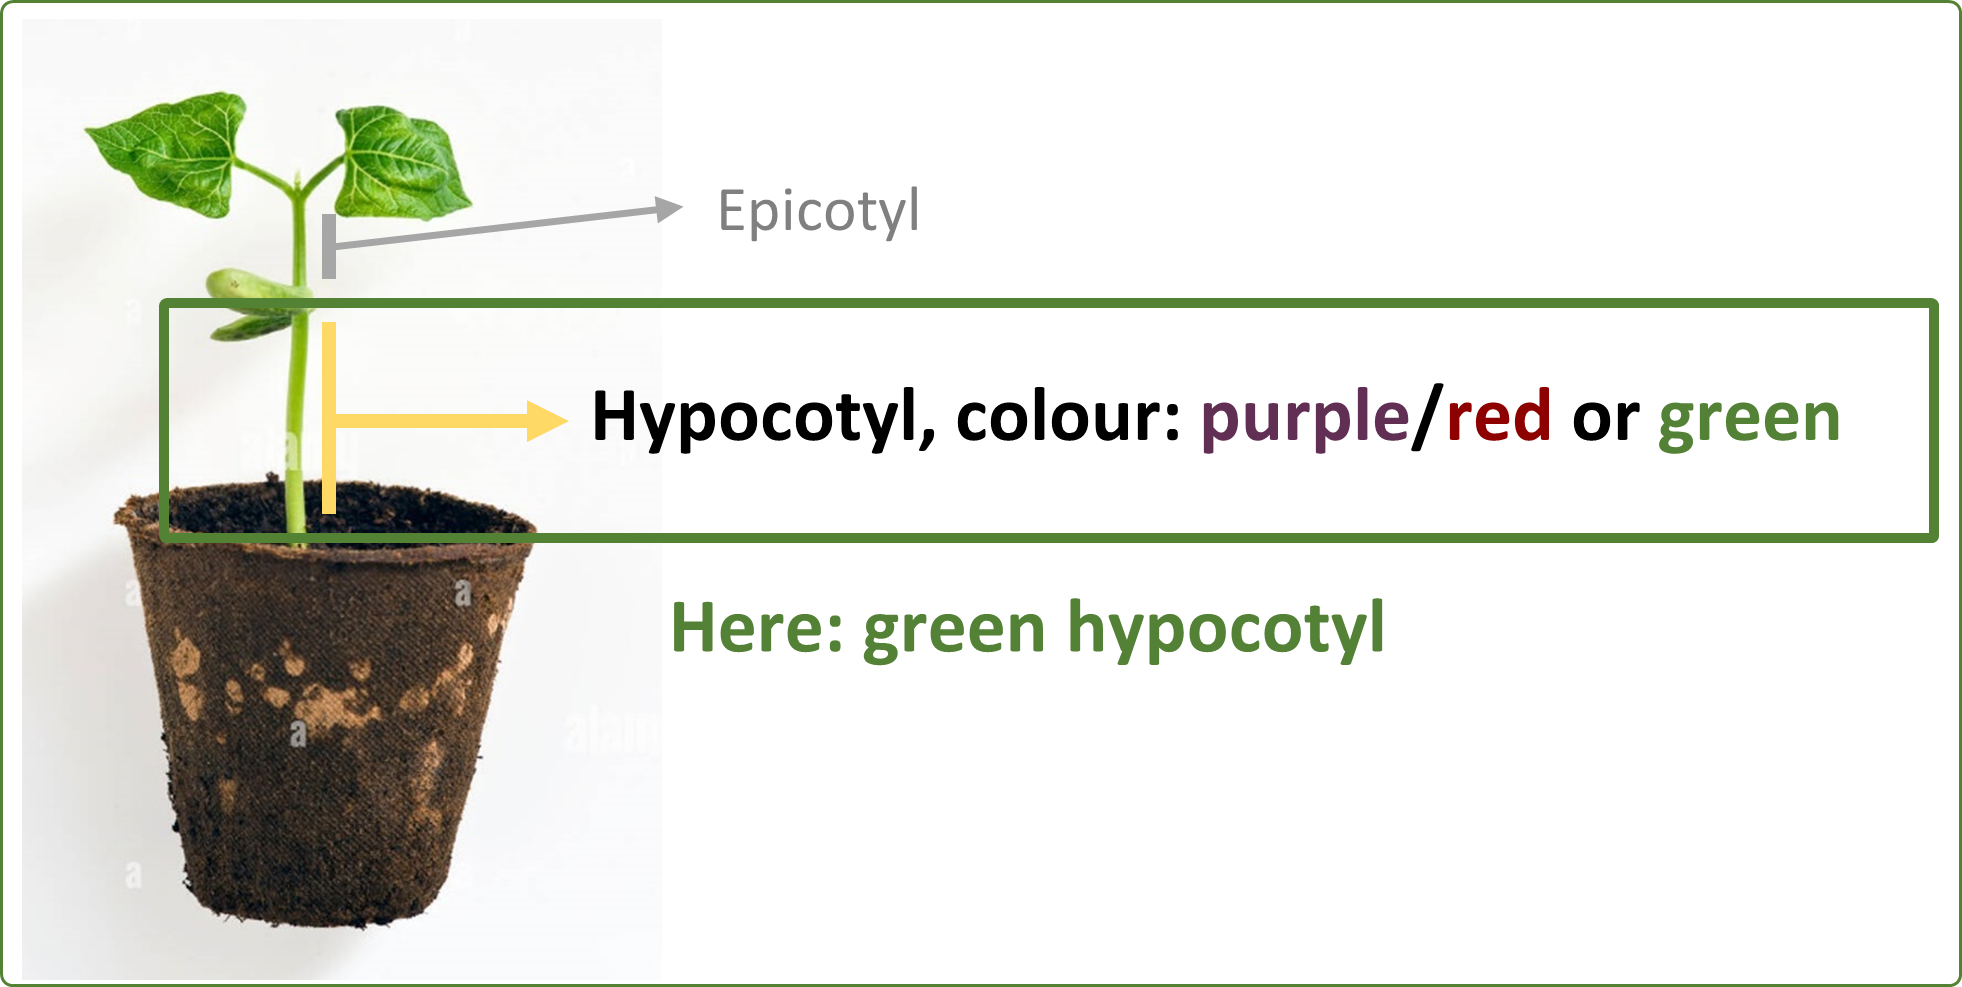
It can have two different colours:
1 = Purple/ Red
2 = Green
- Leaf shape
Bean leaves are trifoliate, so each leaf consists of three leaflets. The trait we need you to score is the shape of the terminal leaflet on the third fully developed leaf of one plant. Please take an image of the full leaf still attached to the plant using the colour checker and placing the leaf in the middle with the colour scale visible. Please consult the video for further instructions:
There are three possible leaf shapes:
- Triangular
- Round
- Quadrangular
Please also tell us your scored value (picture below).

- Leaf colour: chlorophyll
Record the intensity of the leaf green colours, looking at the leaves of the plant.
We can have three different categories: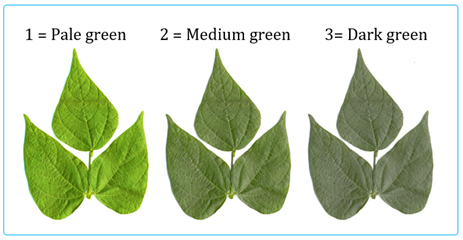
Please choose the most developed plant of each plot to score this trait and base your observation on more than one leaf (average of different leaves).
For scoring, please take an image of a full leaf attached to the plant using the colour checker and placing the leaf in the middle, so that the colour scale is visible.
- Leaf colour: anthocyanin
Record if a red or purple colour is present on the leaf (presence/ absence of anthocyanin pigmentation). Look at the leaves of the selected plant and the leaf veins.
It can have two options:
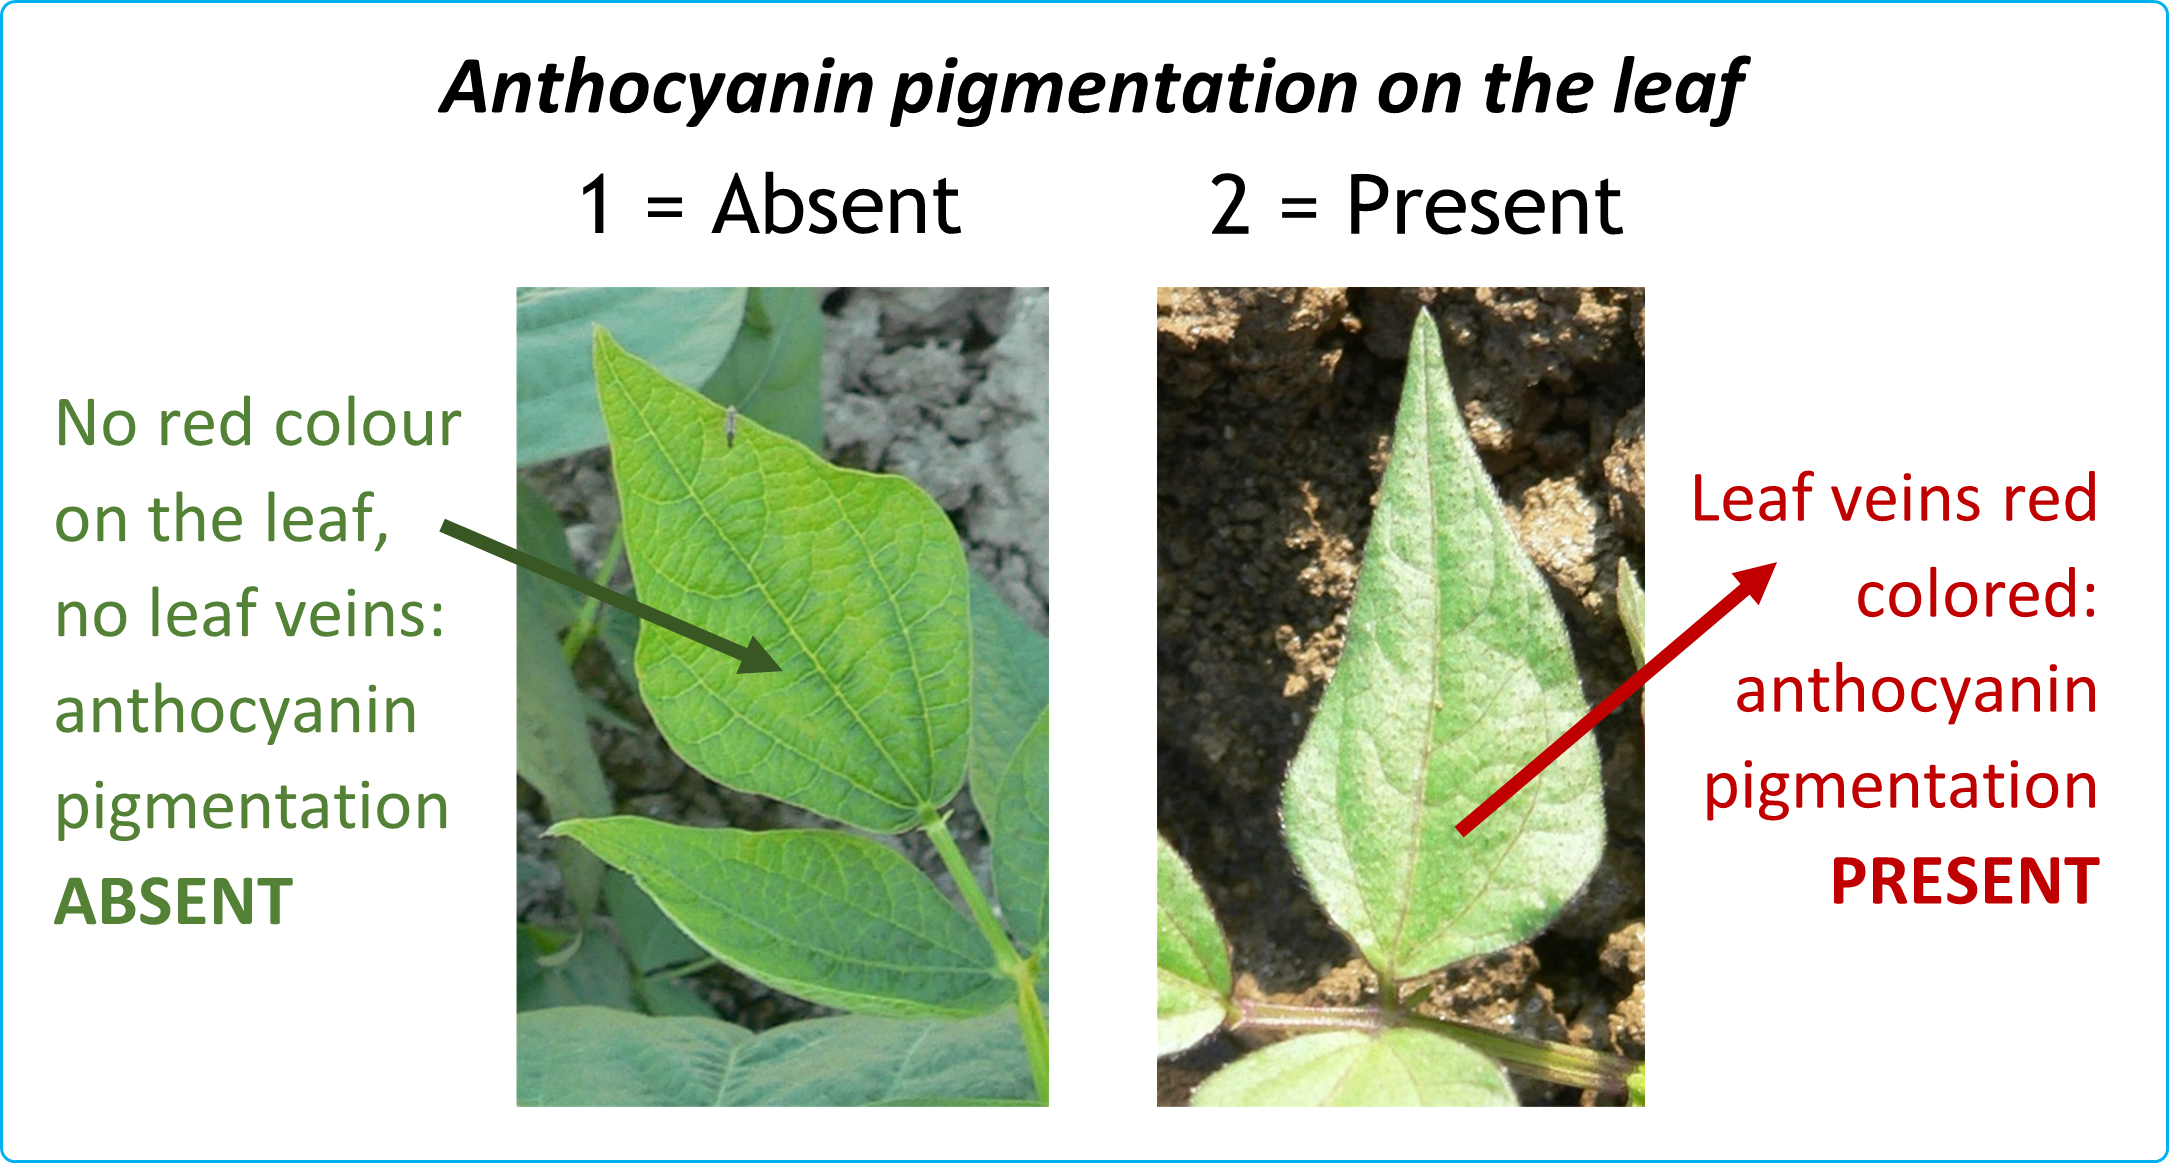
For scoring, please take an image of a full leaf attached to the plant using the colour checker and placing the leaf in the middle, so that the colour scale is visible.
- Growth habit
Bean plants can have two different growth types:
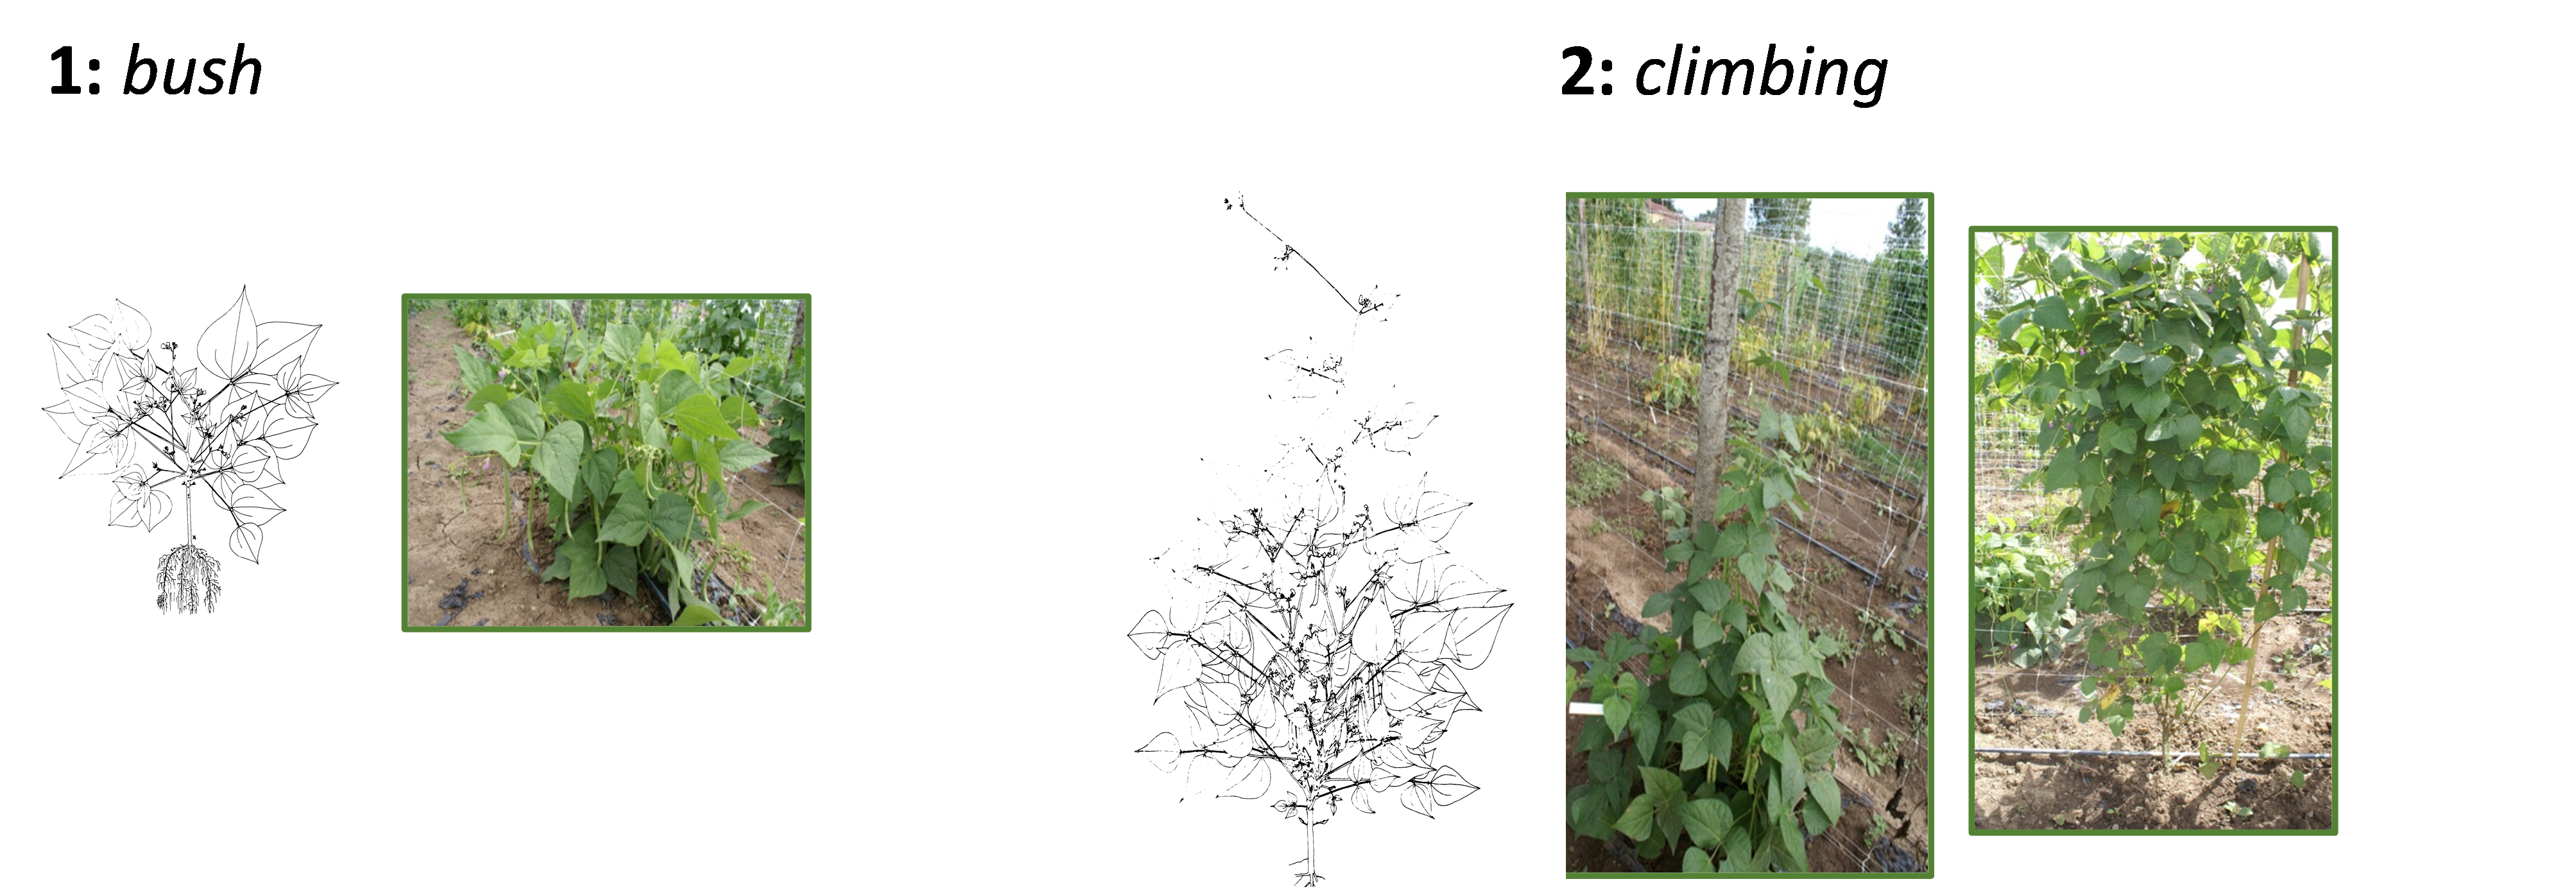
Please indicate the growth types for your beans in the app under ‘Growth habit’.
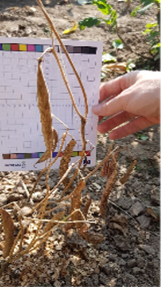
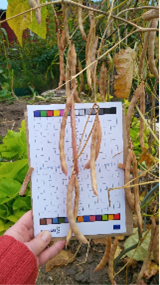
- Stem diameter
Please measure the stem diameter of one representative plant of each plot at maturity. Take the measure right above the soil surface (see image). You can use a ruler or a calliper and tell us the length in mm.

- Day of harvest
Please take a picture of a section of the mature plot at harvest time using the colour checker. Make sure that the full colour checker is visible. When uploading the image, the upload date is automatically recorded by the App as harvest date. This is the preferred way.
If the image is older than the upload date or if you could not take an image but recorded the date of harvest manually, you have the possibility to tell us the harvest date directly. Please use that option only, if the first possibility is not working for you.
Knowing harvest and sowing date allows us to calculate the days until harvest.
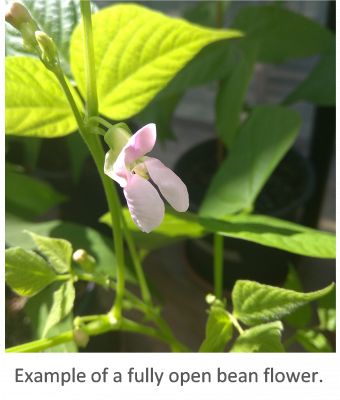
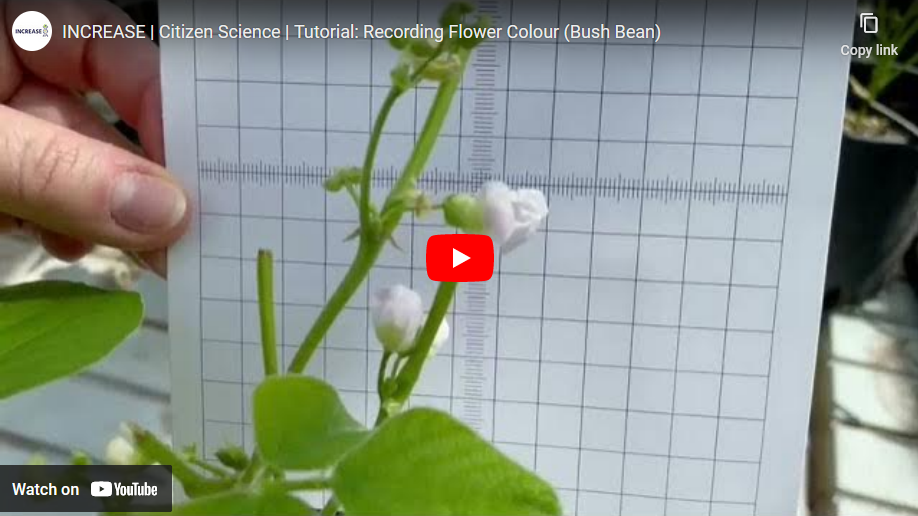
- Start of flowering
Bean flowers are about 1 cm long and have distinct upper and lower lobes. The flower position is at the node. Please record the date once you see in your plot the first fully open flower. You have two possibilities:
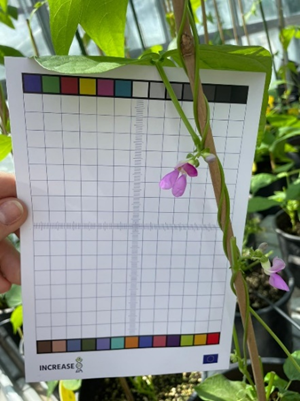
- Please take an image of the flower by placing the colour checker behind the flower. Please make sure, the scale and the colour reference are visible. When uploading the image, the upload date is automatically recorded by the App as flowering date. This is the preferred way.
- If the image is older than the upload date or if you could not take an image but recorded the date of flowering manually, you have the possibility to tell us the flowering date directly. Please use that option only, if the first possibility is not working for you.
- Maximum flowering
Please record the date, once you see that all plants in your plot have at least one fully open flower. You have two possibilities:
- Please take an image of the flower by placing the colour checker behind the flower. Please make sure, the scale and the colour reference are visible. When uploading the image, the upload date is automatically recorded by the App as maximum flowering date. This is the preferred way.
- If the image is older than the upload date or if you could not take an image but recorded the date manually, you have the possibility to tell us the maximum flowering date directly. Please use that option only, if the first possibility is not working for you.
- Flower colour
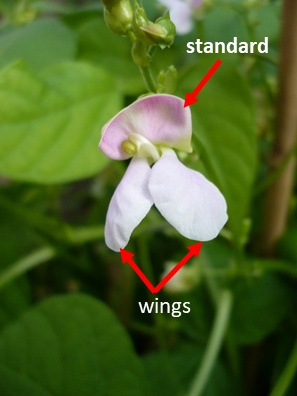
Please record the colour of the flowers (standard and wings) in the app.
Bean flowers have two different types of petals (see image below). The standard is the upper part and the two wings are forming the lower part. Please record the colour of both types when your plants have a decent number of flowers and chose a representative flower of a well-developed plant from each plot.
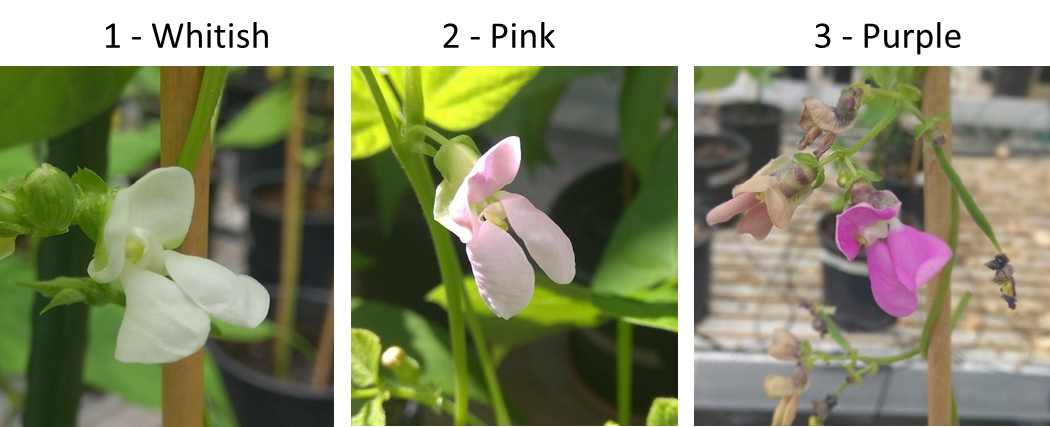
Note that often standard and wings have the same colour. However, there are bean varieties where standard and wing colour differ.- Please take an image of the flower by placing the colour checker behind the flower. Please make sure, the scale and the colour reference is visible (see picture and video).
- Please tell us your score for the flower colour of standard and wings using the indicated colour classification number.
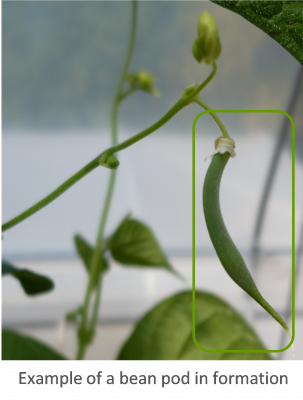
- Pod formation start
Please record the date once the first visible bean pod in your plot appears.
- Please take an image of the pod by placing the colour checker behind the pod. Please make sure, the scale and the colour reference are visible. When uploading the image, the upload date is automatically recorded by the App as pod formation date. This is the preferred way.
- If the image is older than the upload date or if you could not take an image but recorded the date of pod formation manually, you have the possibility to tell us the pod formation directly. Please use that option only, if the first possibility is not working for you.
Please refer to this video tutorial for further guidance:
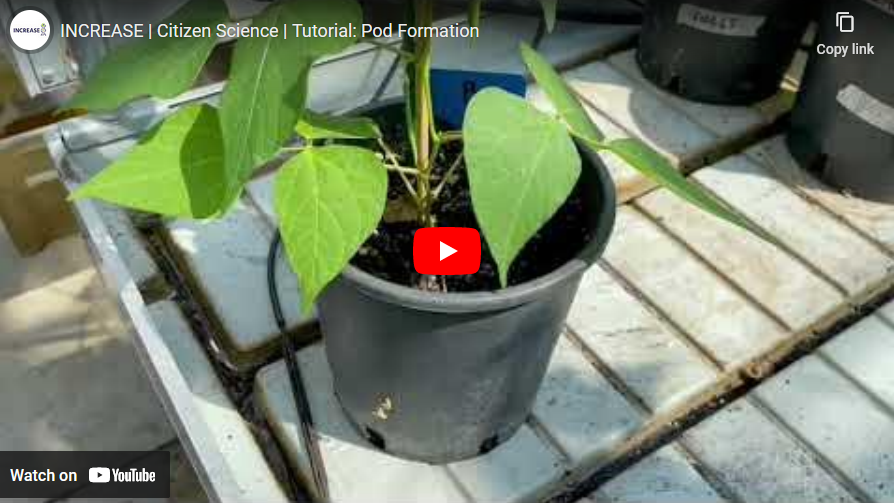
- Maximum pod formation
Please record the date once all plants in your plot have pods.
Please take an image of the pod by placing the colour checker behind the pod. Please make sure, the scale and the colour reference are visible. When uploading the image, the upload date is automatically recorded by the App as maximum pod formation date. This is the preferred way.
If the image is older than the upload date or if you could not take an image but recorded the date of maximum pod formation manually, you have the possibility to tell us the maximum pod formation directly. Please use that option only, if the first possibility is not working for you.
- Fresh Pod cross-section
Take an immature but fully expanded and well-developed pod from the plant. Cut it at the widest part and look at the shape of this pod section.
Please take a picture of the cross section using the colour checker. Make sure that the full colour checker is visible.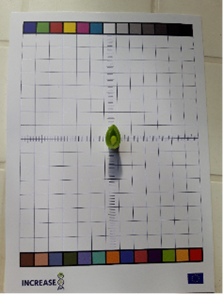
- Fresh Pod curvature
Take an immature but fully expanded and well-developed pod off the plant and look at the shape of its curvature.
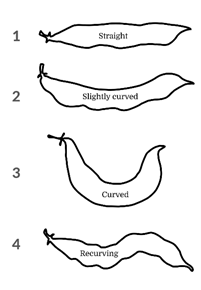
Please take a picture of the pod using the colour checker. Make sure that the full colour checker is visible.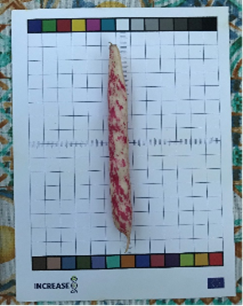
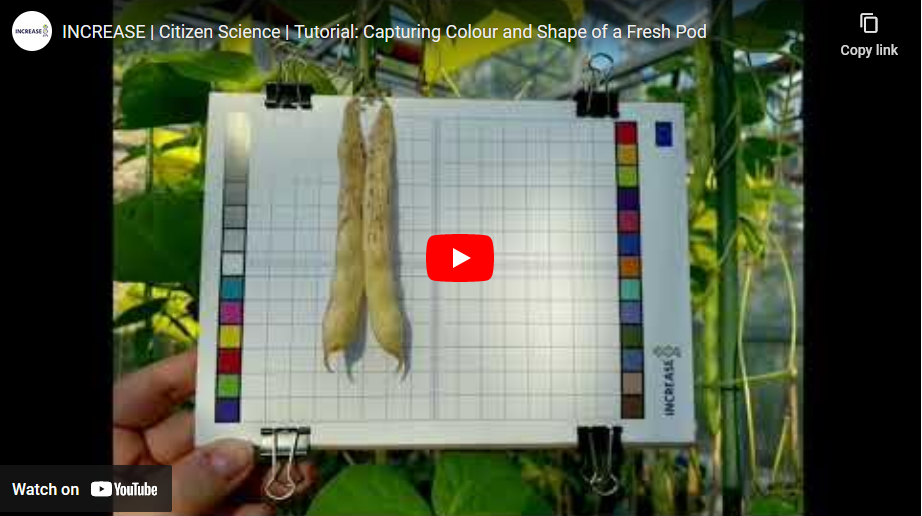
- Fresh Pod colour
Take a picture of the pod still attached to plant using the colour checker as seen in the video. Make sure that the full colour checker is visible.
The pod should be ripe but not yet ready for harvesting (not dry).
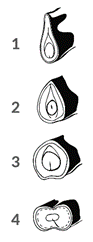
- Determinacy
There are determinate and indeterminate common bean lines. In determinate common bean lines, the green apex growing at the top of each plant (the terminal meristem) switches from a vegetative to a reproductive state and a terminal inflorescence/flower is produced. The indeterminate common bean lines show a vegetative green apex growing at the top of each plant (the terminal meristem) that continues to produce stems and leaves.
To find out if a bean line is determinate or indeterminate, we look at the apical bud. This is the bud at the tip/end of the main stem. It can be a floral bud (type: determinate, 1) or a leaf bud (type: indeterminate, 2) - see the images provided.
Please, take a picture of the apical bud by using the colour checker and leave the bud intact.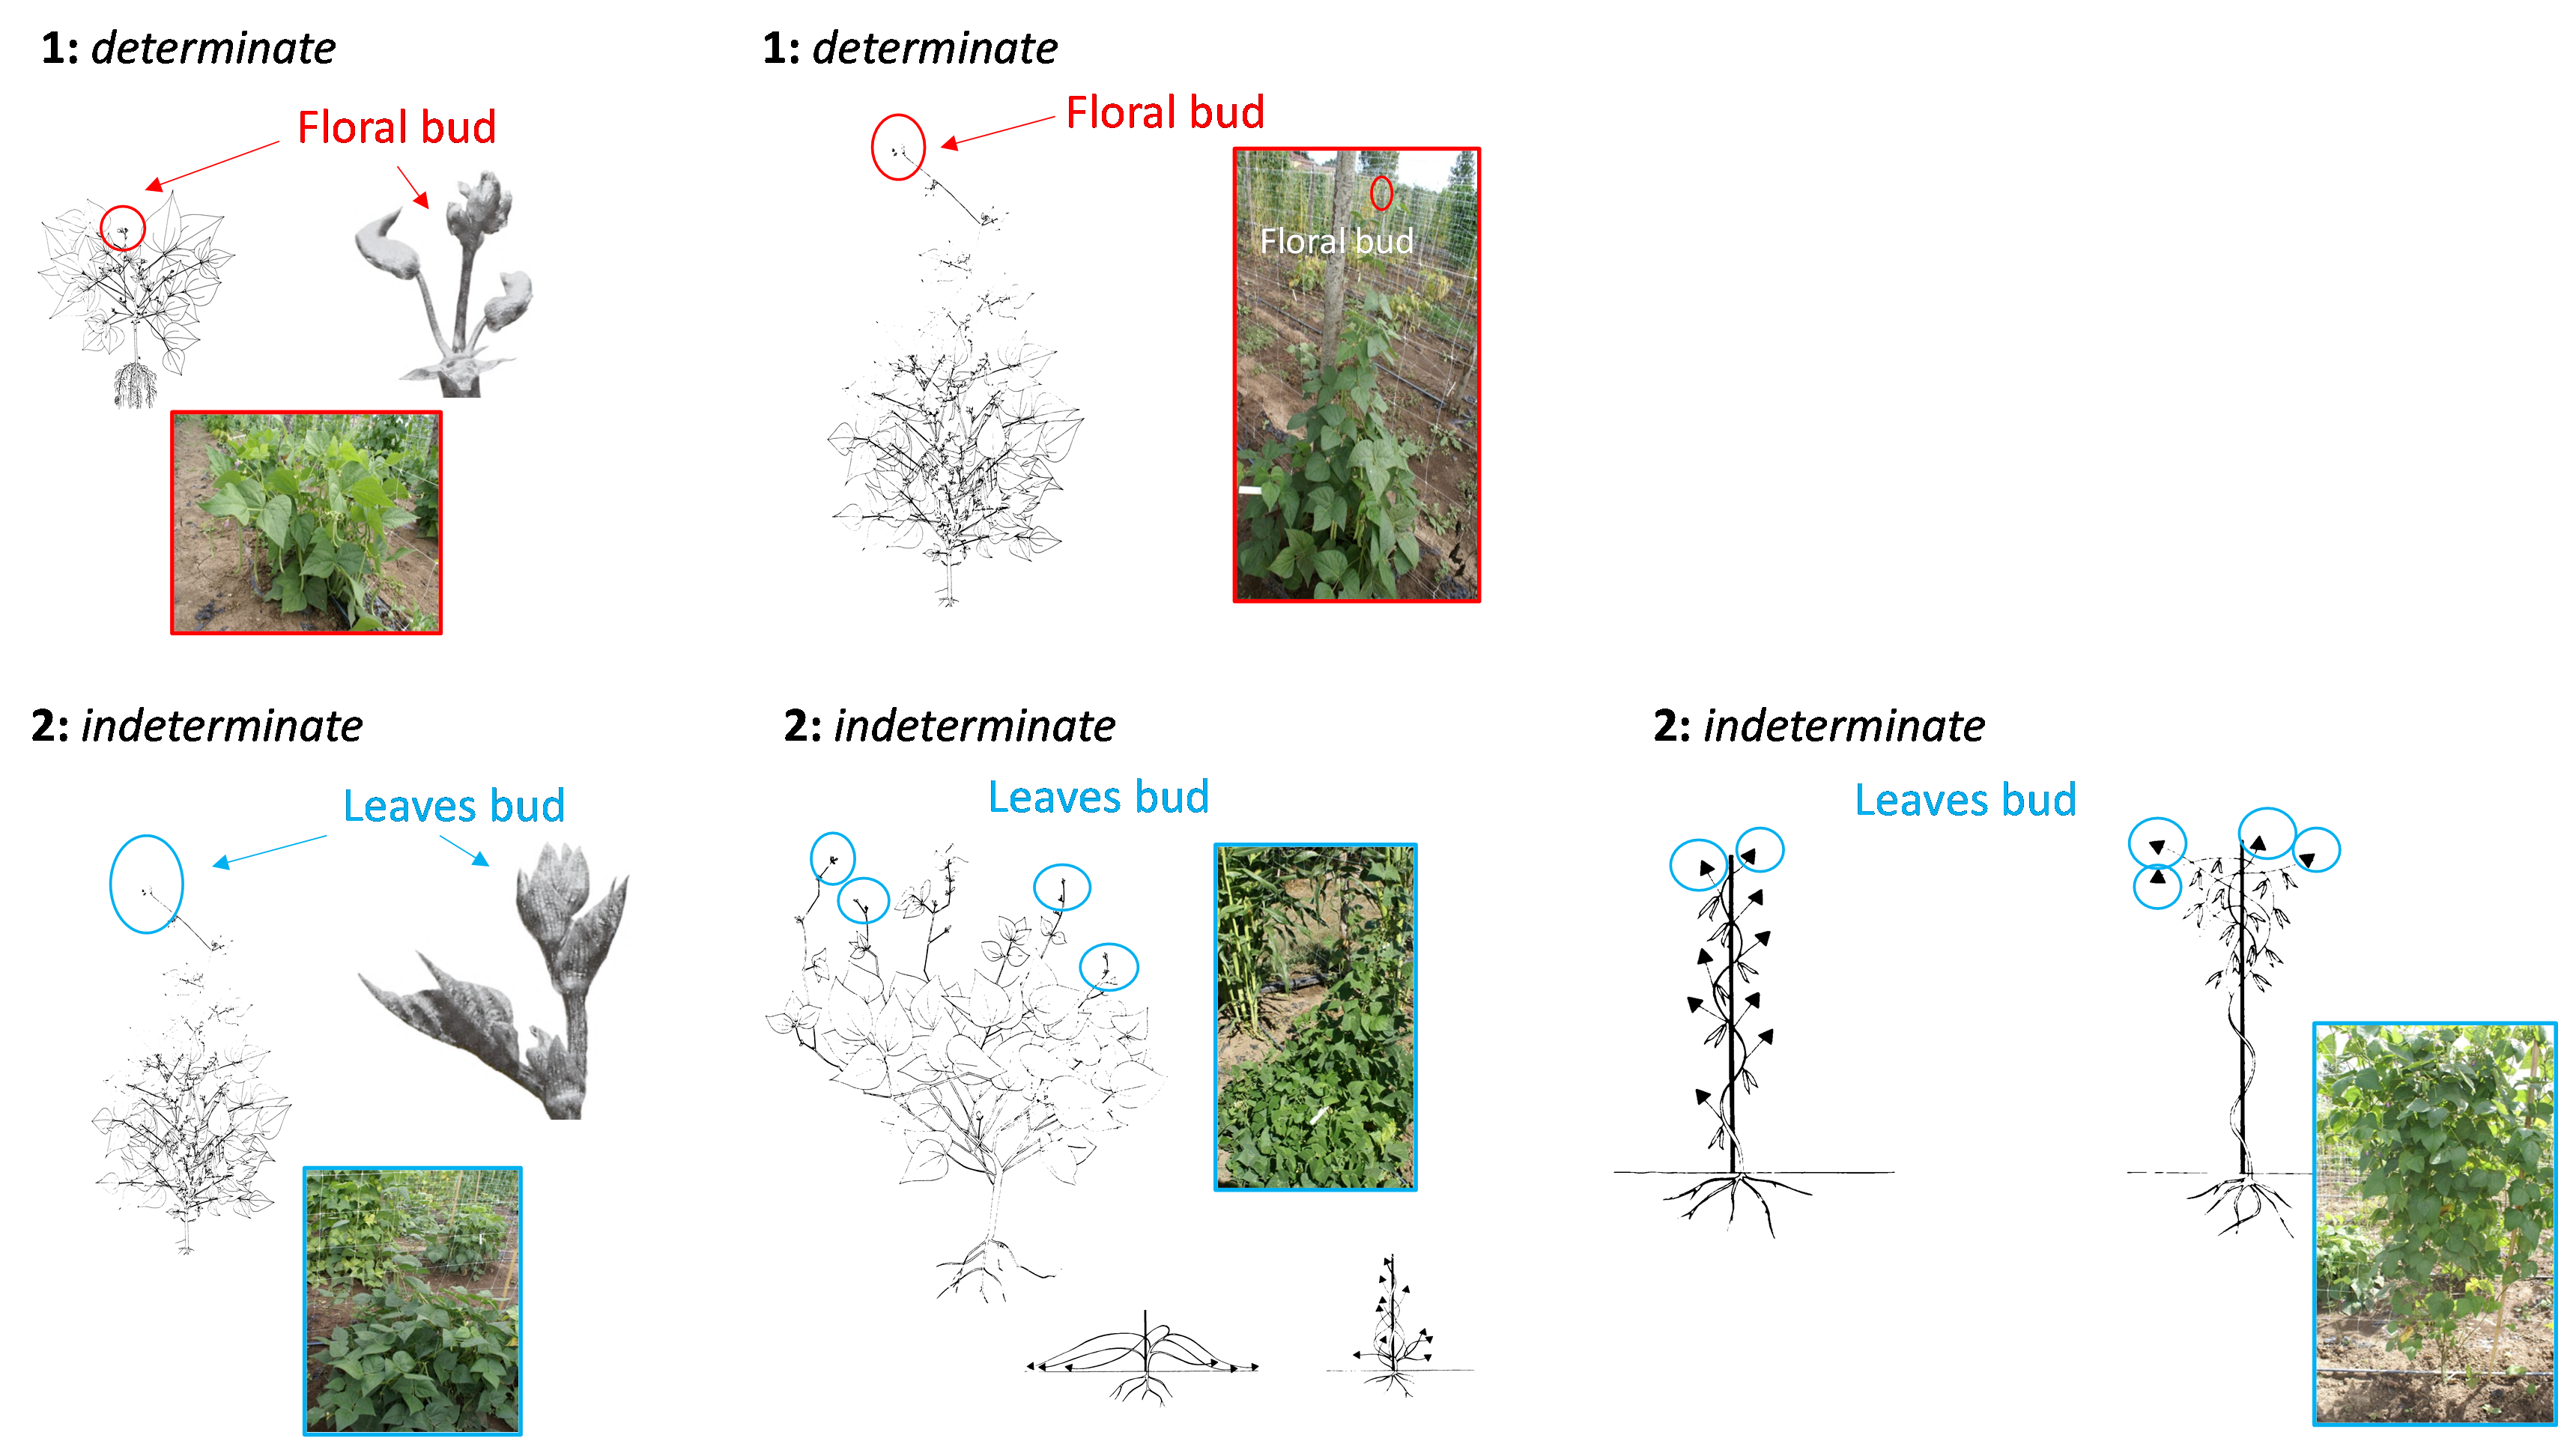
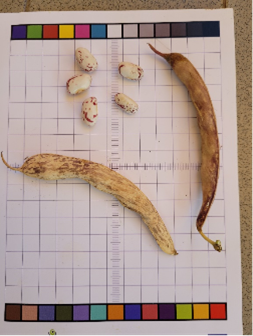
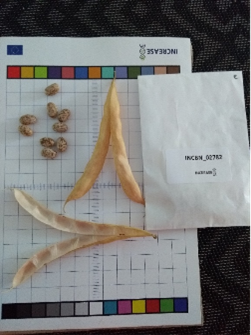
- Pod colour at maturity (dry)
Take a picture from the dry pod, once harvested from the plant, using the colour checker as seen in the video. Please record the image with the full colour checker visible. The pod should be fully ripe and ready to harvest (dry).
- Pod and seed photo
Once dry pods are harvested and seeds collected, we would like you to record several pod and seed colour and appearance features. Please take a photo from a representative pool of pods and seeds from each plot for documentation. Place them on the colour checker and make sure the colour and scale is visible in the image (see tutorial).
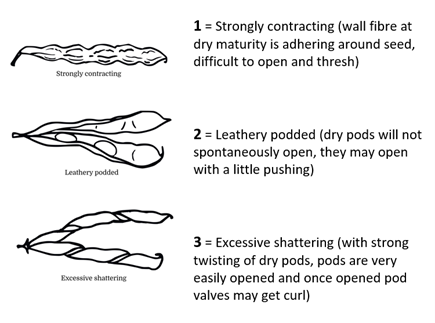
- Pod wall fibre
Please do a visual observation of fully mature (dry) pods and determine the pod wall fibre. Please choose a representative pod of each plot (see image).
- Seed coat pattern
A bean seed can be of uniform colour or have a ground colour with an additional colour pattern (see images). Here, we would like to know if the seed has such a pattern or if they are of uniform colour (pattern absent). Please take a photo of bean seeds from each plot by placing them on the colour checker and tell us your score. Make sure that the full colour checker is visible.
0 = Absent
1 = Present, mottled/spotted
2 = Present, striped
3 = Present, bipartite/tripartite
4 = Present, pattern around Hylum
5 = other (specify in notes)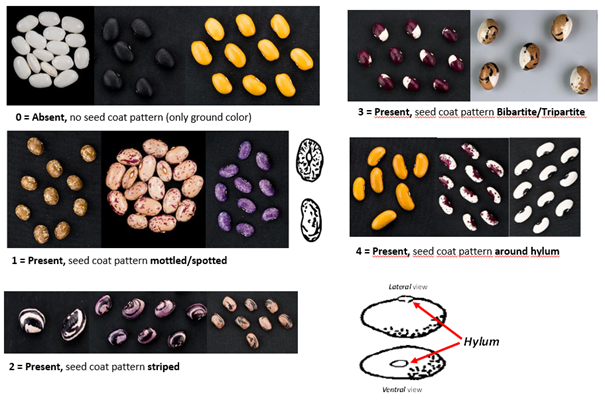
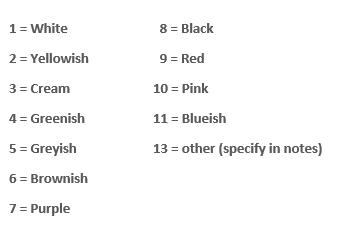
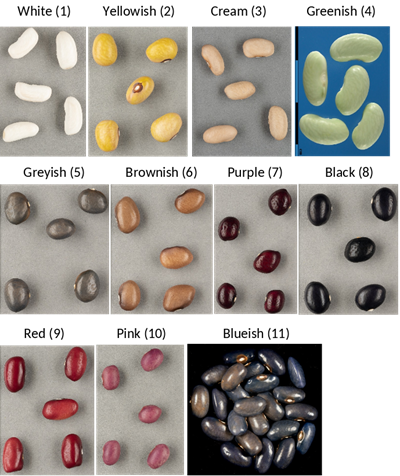
- Seed coat ground and secondary colours
A bean seed can be of uniform colour or have a ground colour with an additional colour pattern (see images). Here, we would now like to know the ground colour (if a pattern is present) or simply the seed colour (if the seeds are of uniform colour) as well as the secondary colour

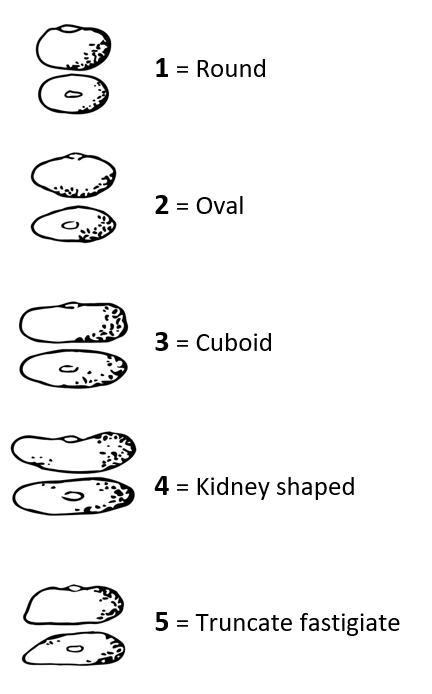
- Seed shape
A bean seed can have the following shapes. Please tell us the shape of your seeds.